
使用するパッケージ
yarn add gatsby-source-contentful @contentful/rich-text-react-renderer @contentful/rich-text-types esm date-fns
yarn add -D dotenv
Contentful API との通信
gatsby-source-contentful: Contentful のデータをソースにできるプラグインdotenv:CONTENTFUL_SPACE_IDとCONTENTFUL_ACCESS_TOKENを env ファイルとして保管することで、GitHub に露出させない
コンテンツの変換
@contentful/rich-text-react-renderer,@contentful/rich-text-types: Contentful の RichText を ReactNode に変換してくれるesm: gatsby-node.js で ES6 のモジュールを import するための変換を行うdate-fns: Contentful の Date オブジェクトの変換や、Markdown の DateString との比較を行う
Contentful に記事データを配置
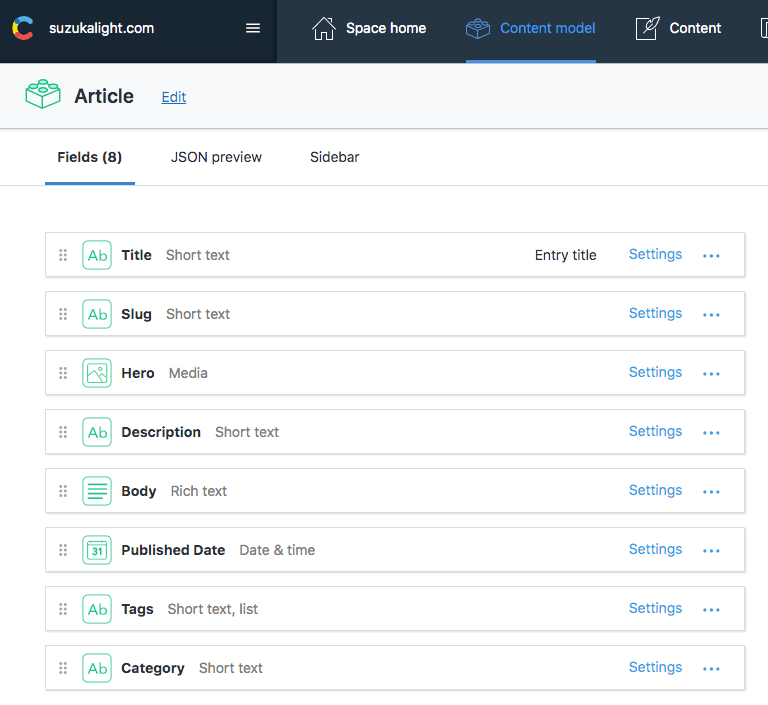
モデル定義
記事用のモデル、Article を定義します。フィールド名は自動で lowerCamelCase されます。
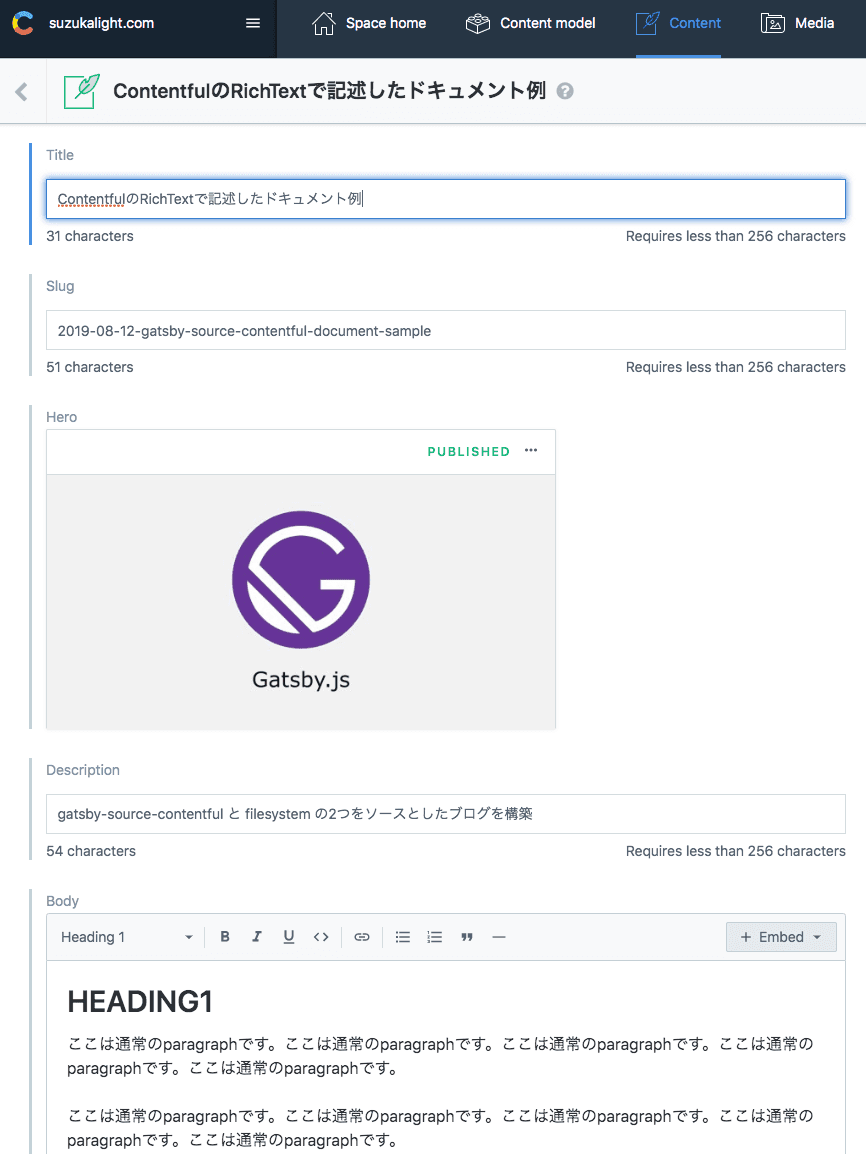
記事の配置
Content メニューから、Article を 1 つ準備します。
Contentful からデータを取得
記事ページ
gatsby-node.js で記事一覧を取得し、createPage を呼び出す処理をサンプルとして解説していきます。
- filesystem と contentful で記事のテンプレートを分ける
- gatsby-source-filesystem と gatsby-source-contentful の両方から記事データを同時に Fetch
- createPage を呼び出すための下処理
filesystem と contentful で記事のテンプレートを分ける
filesystem と contentful では、記事ページを作成する起点となる GraphQL のクエリが異なりますので、export する pageQuery を変えるために、テンプレートファイルを分割しました;
exports.createPages = async ({ graphql, actions }) => {
  const { createPage } = actions;

  const blogPostGitHubTemplate = path.resolve(
    `./src/components/templates/BlogPost/source-github.js`,
  );
  const blogPostContentfulTemplate = path.resolve(
    `./src/components/templates/BlogPost/source-contentful.js`,
  );
  const tagTemplate = path.resolve(`./src/components/templates/Tags/index.js`);
  const categoryTemplate = path.resolve(`./src/components/templates/Categories/index.js`);
Contentful を source とするテンプレートファイルは、下記のようになりました(contentful + モデル名);
import { graphql } from 'gatsby';

import BlogPost from './';

export default BlogPost;

export const pageQuery = graphql`
  query ContentfulBlogPostBySlug($id: String!) {
    site {
      siteMetadata {
        title
        author
      }
    }
    contentfulArticle(id: { eq: $id }) {
      id
      slug
      title
      description
      body {
        json
      }
      date
      category
      tags
      hero {
        title
        description
        sizes(maxWidth: 1440) {
          ...GatsbyContentfulSizes
        }
      }
    }
  }
`;
filesystem と contentful の両方からデータを Fetch
filesystem(markdownRemark) と contentful(contentfulArticle) では、GraphQL の query が異なるため、それぞれのクエリを用いて Fetch を行います。クエリ発行は 1 つの読み出しで可能ですので、allContentfulArticle を追加します(allContentful + モデル名);
const result = await graphql(`
    {
      site {
        siteMetadata {
          title
        }
      }
      allMarkdownRemark(filter: { frontmatter: { status: { eq: "published" } } }, limit: 1000) {
        edges {
          node {
            fields {
              slug
            }
            frontmatter {
              title
              category
              tags
              date
            }
          }
        }
      }
      allContentfulArticle(limit: 1000) {
        edges {
          node {
            id
            title
            description
            slug
            category
            tags
            date
          }
        }
      }
    }
  `);

  if (!result || result.errors) {
    throw result.errors;
  }
createPage を呼び出すための下処理
取得したページ一覧を起点に、createPage を呼び出します。このとき行った下処理は以下のとおりです;
- 取り出した記事データは source によってデータ構造が異なるため、適当なコンバータ(convertArticles)を作成してデータ構造を揃えた
- 記事ページでの prev/next 遷移を実現するために、記事データを公開日時でソートした
- source によって、component に引き渡すテンプレートを振り分けた
- filesystem では slug で、contentful では id で、それぞれ記事データを Fetch させるため、context に両方を詰めた
// Create blog posts pages
  const posts = sortByDate(convertToArticles(result.data));
  posts.forEach((post, index) => {
    const previous = index === posts.length - 1 ? null : posts[index + 1];
    const next = index === 0 ? null : posts[index - 1];
    const { id, slug, source } = post.head;

    createPage({
      path: slug,
      component: source === 'github' ? blogPostGitHubTemplate : blogPostContentfulTemplate,
      context: {
        id,
        source,
        slug,
        previous,
        next,
      },
    });
  });
タグごとの記事一覧や、カテゴリごとの記事一覧
タグごとの記事一覧や、カテゴリごとの記事一覧も、さきほど取得した記事全体の情報を加工することで、作成することができます;
// Tag pages
  const tags = posts.reduce((tags, post) => {
    const tagsInPost = post.head.tags;
    return tagsInPost ? tags.concat(tagsInPost) : tags;
  }, []);

  [...new Set(tags)].forEach(tag => {
    createPage({
      path: `/tags/${kebabCase(tag)}/`,
      component: tagTemplate,
      context: {
        tag,
      },
    });
  });
};
カテゴリリストページ
filesystem/contentful の両方で group キーワードが使用できます。markdown.frontmatter.category と contentful.category の両方で、カテゴリをそれぞれ groupBy しておきます;
export const pageQuery = graphql`
  query {
    site {
      siteMetadata {
        title
      }
    }
    allMarkdownRemark(filter: { frontmatter: { status: { eq: "published" } } }, limit: 2000) {
      group(field: frontmatter___category) {
        fieldValue
        totalCount
      }
    }
    allContentfulArticle(limit: 2000) {
      group(field: category) {
        fieldValue
        totalCount
      }
    }
  }
`;
その結果を手計算で合成することで、全体としてのカテゴリ一覧を生成します;
const Categories = ({ location, data, pageContext }) => {
  const { site, allMarkdownRemark, allContentfulArticle } = data || {};

  const groups = [...allMarkdownRemark.group, ...allContentfulArticle.group];

  const categoriesMap = groups.reduce((cat, group) => {
    if (!cat[group.fieldValue]) cat[group.fieldValue] = 0;
    cat[group.fieldValue] += group.totalCount;
    return cat;
  }, {});

  const categories = Object.keys(categoriesMap)
    .sort((a, b) => a.localeCompare(b))
    .map(key => ({
      fieldValue: key,
      totalCount: categoriesMap[key],
    }));

  return (
    <CategoriesPage location={location} siteMetadata={site.siteMetadata} categories={categories} />
  );
};
カテゴリごとの記事一覧
カテゴリに所属する記事の総数を取得したいため、totalCount を追加しておきます。このデータを手計算で合計することで、カテゴリに所属する記事の総数を表示します;
const CategoryPage = ({ data }) => {
  const { site, allMarkdownRemark, allContentfulArticle } = data || {};
  const totalCount = allMarkdownRemark.totalCount + allContentfulArticle.totalCount;

  return <Component />;
};

export const pageQuery = graphql`
  query($category: String) {
    site {
      ...
    }
    allMarkdownRemark() {
      totalCount
      ...
    }
    allContentfulArticle(limit: 2000, filter: { category: { in: [$category] } }) {
      totalCount
      edges {
        node {
          id
          title
          description
          slug
          category
          tags
          date
        }
      }
    }
  }
`;
完成したページ
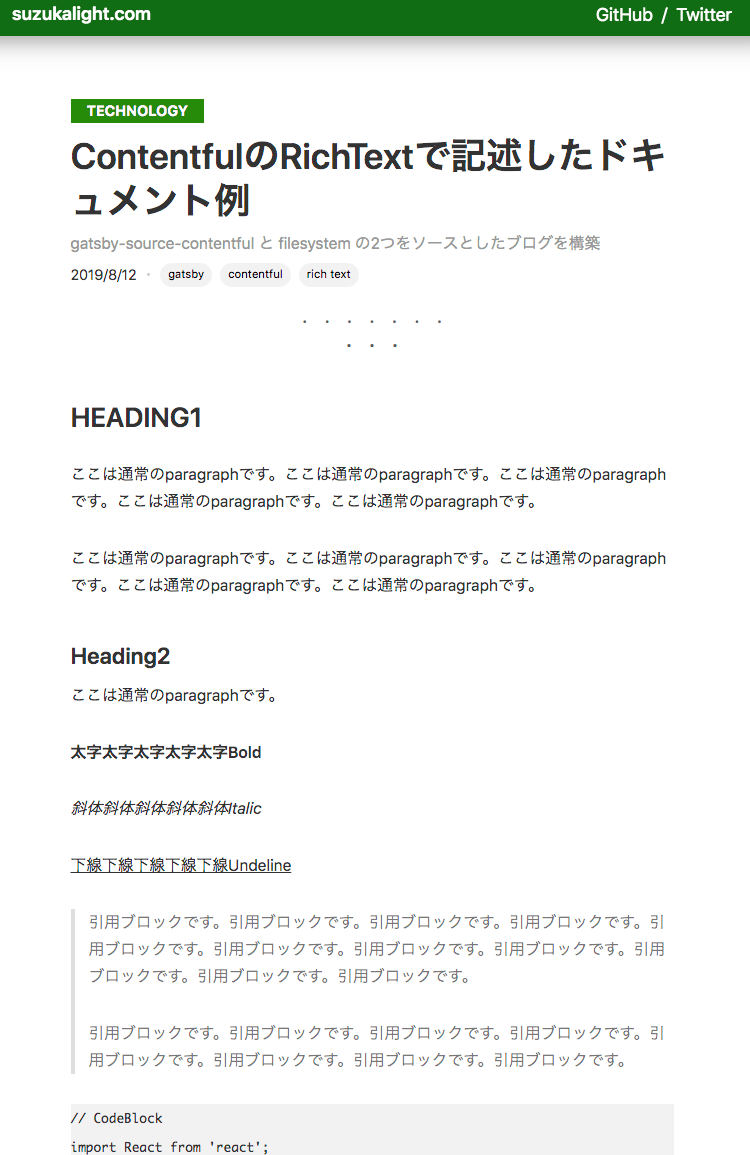
https://suzukalight.com/2019-08-12-gatsby-source-contentful-document-sample/
Tips
RichText の展開
(※注:この部分は、記事の body 部分を RichText にした場合に、追加で必要な処理です。body を Text(Long)にした場合は、childMarkdownRemark による html 変換が利用できるため、より簡単にマークアップ処理が可能です)
意外と厄介なのが、Contentful の RichText の処理です。記事データが JSON で構造化された状態で渡されるため、それを HTML に変換してやる必要があります。
import React from 'react';
import { documentToReactComponents } from '@contentful/rich-text-react-renderer';
import { BLOCKS } from '@contentful/rich-text-types';

const renderOptions = {
  renderNode: {
    [BLOCKS.PARAGRAPH]: (_, children) => <p className="contentful-paragraph">{children}</p>,
    [BLOCKS.EMBEDDED_ASSET]: node => {
      const { target } = node.data || {};
      const { title, description, file } = (target || {}).fields || {};
      if (!file) return null;

      const key1 = Object.keys(file)[0];
      const { contentType, url } = file[key1];
      const mimeGroup = contentType.split('/')[0];

      switch (mimeGroup) {
        case 'image': {
          return (
            <img
              title={title ? title[key1] : null}
              alt={description ? description[key1] : null}
              src={url}
            />
          );
        }
        default: {
          return null;
        }
      }
    },
  },
};

export const contentfulArticleToReactComponents = json => {
  console.log('json', json);
  return documentToReactComponents(json, renderOptions);
};
const BlogPostTemplate = ({ location, siteMetadata, head, body, richTextJson, pageContext }) => (
  ...
      {richTextJson && (
        <div className={styles.article}>{contentfulArticleToReactComponents(richTextJson)}</div>
      )}
  ...
& p[class='contentful-paragraph'] {
    white-space: pre-wrap;
  }

  & p[class='contentful-paragraph'] > code {
    display: block;
    background-color: #f2f2f2;
    white-space: pre-wrap;
  }
esm を利用して、gatsby-node.js で ESM パッケージを import
gatsby-node.js は Node 環境向けのファイルなので、そのままだと import 構文は利用できません。いくつか対策はあると思いますが、こちらの Issueを参考に、esmモジュールを利用して対応しました;
require = require('esm')(module);
module.exports = require('./gatsby-node.esm.js');
date-fns を利用した、Date の扱い
frontmatter で date(formatString: "YYYY/M/D") として拾ってきても構わないのですが、記事のソートを日付で行いたい場合は、時刻まで拾ってきたいので、graphql での変換はいったん行わないようにします。
かわりにmomentなどのライブラリで変換を行えば OK なのですが、最近はdate-fnsを採用する例も増えてきているので、これを素振りしました;
import format from 'date-fns/format';

format(date, 'YYYY/M/D');
import differenceInMilliseconds from 'date-fns/difference_in_milliseconds';

export const sortByDate = data => data.sort((a, b) => differenceInMilliseconds(b, a));